Rockwall Trail - Kootenay National Park, BC
- Camilla Ho
- Nov 5, 2023
- 14 min read

Updated: Jan 12, 2025
We can't get enough of the Kootenays. The hikes just keep getting better and better... and longer and longer 🙃. This summer, we completed 5 backcountry trips - Rockwall Trail coming out on top at 55km (34 miles) and traversing through 3 alpine passes. Nestled in Kootenay National Park, this was our first backpacking trip in the Canadian Rockies and our first time completing a multi-night thru-hike. Without a doubt, this trail is the most consistently breathtaking and scenic alpine hike I've ever experienced. It offered everything from absolutely beautiful high alpine meadows and forested trails to rushing rivers, creeks, and waterfalls, hanging glaciers, a picturesque glacier-fed lake, and the massive limestone cliff known as the "Rockwall" - in some sections, looming over 900m above the trail.
Hiking Route:
I've heard of hikers completing this in 2 nights (I will leave this for all you super super hikers out there), but we stretched it to 5 nights and 6 days. Get permits early - obtaining backcountry permits for this trail can be a bit of a challenge, particularly for Floe Lake. When Parks Canada opens the booking portal, you're placed in a randomized queue. I was lucky to be among the first in line, while my husband found himself somewhere in the 7000s in the queue on one device (on another device, he was in the 24,000s). Permits for the entire hike-thru were sold out within minutes. I recommend researching different route options just in case, all the while maintaining realistic expectations about daily hiking distances that suit your comfort level. The trail includes many lengthy steep sections that make for some challenging days. You will also need to purchase a Parks Canada Discovery Pass to visit anywhere in a national park.
Camping at: Helmet Falls, Tumbling Creek, Numa Creek, and 2 nights at Floe Lake Campground
If I had the chance to hike the Rockwall Trail again, I'd stick with this same route: Paint Pots trailhead to Floe Lake trailhead. There were so many amazing highlights on this hike, but capping it off with a float and dip in Floe Lake was the perfect reward - so beautiful!
In terms of the number of nights, I'd say 4-5 nights is the perfect amount of time if your aim is to soak in as much of the landscape as possible. Between campgrounds, there were tons of spots along the trail that made me want to kick back and soak in all the natural beauty.
Here we go!
Rockwall Trail in Kootenay National Park
Route: Paint Pots trailhead to Floe Lake trailhead
Highest elevation point: 7,664 ft (2,336 m) at Numa Creek

Located on the ancestral and traditional lands of the Ktunaxa and Secwepemc First Nations, Kootenay National Park spans 1,406 square kilometers in the heart of the Canadian Rocky Mountains. It shares boundaries with Yoho National Park, Banff National Park, and Mount Assiniboine Provincial Park. So much rich beauty and biodiversity on these lands!
Gear wish list:
- Extra fuel, stick with 13.7 oz + sizes for multi-night hikes
- Windscreens for our stove
- My balaclava (nights were so cold and my ears and neck could have used the coverage)
- My book (first time I did not bring one on a multi-night!)
Personal lessons:
We always carry more fuel than we need - not this time 🙃. To save space in our packs, we decided to each bring a small MSR fuel canister (instead of the usual bigger sizes), each good for 24 boils. Our first night took us by surprise with a significant drop in temperature and extreme winds, resulting in us using almost the entire first canister just to prepare dinner. This challenged us to get super creative with our breakfasts and morning coffees over the next few days and to be extra mindful of our fuel use for dinner boils. Near the end of our trip, we were incredibly grateful for our trail buddies who were hiking in the same direction! On their last day (our second last day), they gifted us their remaining fuel before they hiked out. Thank you, hiking friends!
Respect the park and tips for backcountry camping:
- Follow Leave No Trace principles - pack out whatever you pack in
- Use the bear caches provided
- Follow park and camp regulations
- Protect sensitive vegetation - stay on trails, respect trail markers, and avoid the out-of-bound areas
- Do not feed any wildlife - it's a risk to people and wildlife
- There are no greywater disposal units at any of the campgrounds along Rockwall Trail. Pack out all your food bits and dispose of the grey water at least 70 m from camp or water
Getting to the trailhead
If you plan to hike the Rockwall Trail as a thru-hike, there are two primary trailheads: the Paint Pots trailhead and the Floe Lake trailhead. Alternatively, you can access the trail through the Numa Creek trailhead, but this will only lead you to a mid-access point on the Rockwall trail. Paint Pots trailhead and Floe Lake trailhead are 13km apart along Hwy 93, with no available shuttle services. Some options for getting to the start of your trail, or getting back to your vehicle at the of your hike:
Park at the trailhead where you will exit your hike, and hitch-hike to the trailhead where you will start your hike.
Alternatively, you can park at the trailhead where you will start your hike, and hitch-hike back to your vehicle when you exit on the other end.
Consider joining online trail groups to coordinate rides with other hikers who share the same/similar hiking dates.
Go with a larger group and park one vehicle at the start of the trail, and a second vehicle at the exit trailhead.
My husband and I didn't have the chance to arrange rides with other hikers before our trip, so we went with option 1. We preferred having our vehicle waiting for us as we exited the trail - no regrets! Hitch-hiking is common between these trailheads - it took us less than 15 minutes to hitch a ride. It's also probably a bit easier to hitch a ride at the start when you're fresh and clean, as opposed to being unshowered and dusty (and possibly smelly) after spending 3 to 5 days in the forest. Though, I will say, my ego still took a slight hit after a few drivers breezed past us in the initial 10 minutes! If your timing works out, you can also approach someone who has just completed the trail and request a ride to the other trailhead.
Directions:
Radium Hot Springs is where we stayed the night before. It's about a 45-minute to an hour's drive to the Floe Lake trailhead, or an additional 10 minutes to reach the Paint Pots trailhead. From Radium Hot Springs, take BC-93 N and make a left turn into the Floe Lake trailhead parking lot, or continue about 13 km further up for the Paint Pots trailhead.
If you are travelling from Lake Louise or Banff, both are about a 35-45 minute drive to the Paint Pots trailhead, or an additional 10 minutes to Floe Lake trailhead. From these locations, take AB-93 S (signs for Radium Hot Spgs S) and make a right turn into the Paint Pots trailhead parking lot, or continue about 13 km further South for the Floe Lake trailhead.
Parking:
There are a decent number of parking spots at the Floe Lake trailhead parking lot, although it's not exceptionally large. It appears that overflow parking extends along the highway. A well-maintained outhouse is also available at the parking lot if you need to go before hitting the trail.
The Paint Pots trailhead parking lot is notably larger than the Floe Lake trailhead lot. You'll also find an outhouse here to use before hitting the trail.
Distance between trailheads, campgrounds, and elevation chart:

Image Source: Parks Canada
Day 1 - Paint Pots trailhead to Helmet Falls Campground
15 km, with an elevation gain of 310 m. This section of the hike took us approximately 5.5 hours, maintaining a steady pace along a lush and forested trail. The first stretch of the trail is relatively flat with a very gradual increase in elevation. Beyond the Helmet/Ochre Junction, the terrain starts to get a little steeper, with a series of ups and downs. Overall, the trail to Helmet Halls Campground is quite easy. In the end, what got me was covering 15 km on the first day. As we approached Helmet Falls Campground, my legs were craving a serious break, and my wide, flat feet were starting to stage a pinchy protest!
Our journey:

At 1.3 km from the trailhead, you will reach this bridge to access the Paint Pots trail. Once you've crossed the bridge over the Vermilion River, take a left. This will link you to the Ochre Creek Trail. From there, it's 2.4 km to link onto the Helmet Creek Trail.

The trail will take you through the Ochre Beds - the vibrant yellow and reddish colour of the iron-rich clay was stunning! I strongly recommend delving deeper into the history of this area and the significance of ochre for Indigenous people of this land.
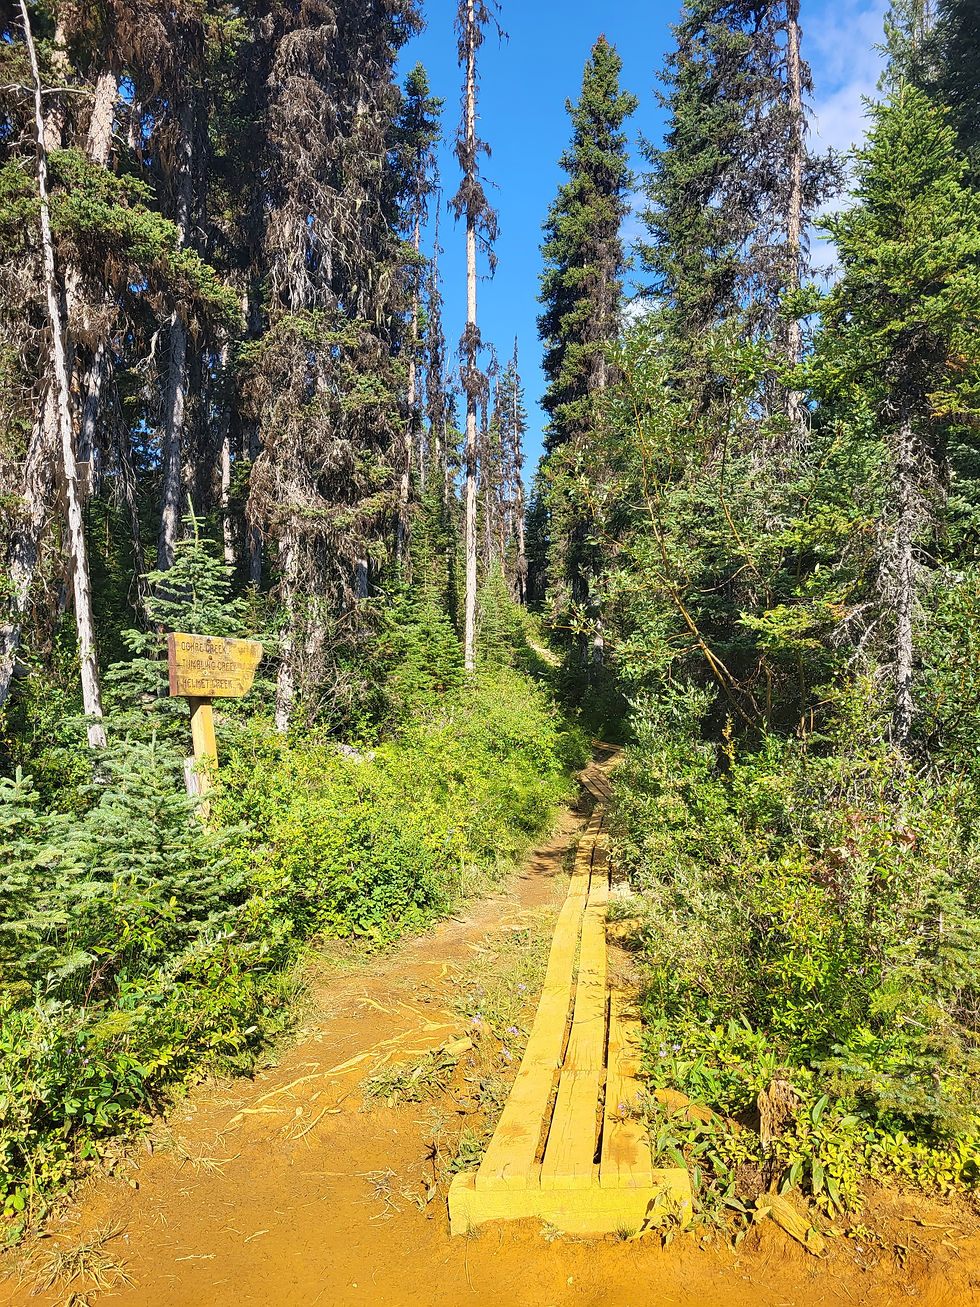
Follow the sign for "Ochre Creek / Tumbling Creek / Helmet Creek" through the forest.

Keep going on the Ochre Creek Trail and get yourself ready for some seriously stunning views of the surrounding mountain ranges! After you pass the turnoff for Tumbling Creek Trail, it's another 2.6 km to the Helmet/Ochre Junction (small campground).
Helmet/Ochre Junction
Distance: 6.3 km; Elevation: 1,520 m

Before crossing the bridge over Ochre Creek, this is a great open area for a snack break with water access. Otherwise, cross the small bridge to reach the Helmet/Ochre Creek Campground. From here, it's about 8.8 km to Helmet Creek Falls Campground.

From the campground, cross the bridge over Helmet Creek.

You will be hiking through dense forest for most of the remaining hike to Helmet Falls Campground.

Suspension bridge about three-quarters into Helmet Creek Trail, crossing Helmet Creek once more.

With 0.3 km to go, you will come across a small creek crossing.

And within the next few minutes, you will find the Helmet Warden Cabin - a beauty!
Helmet Falls Campground
Distance: 15 km (from Paint Pots); Elevation: 1,760 m

Setting up camp! Once you've passed the Helmet Warden Cabin, you'll cross one more small creek before reaching the Helmet Falls Campground. We were one of the first to arrive and snagged ourselves this lovely spot right by the river.
There are many camp pads to choose from at Helmet Falls (some more exposed than others) and access to a reliable water source. Pit toilets, bear caches, and high tables and benches are also available at this campground.

A closer view of Helmet Falls, which stands at 300 m (984 ft) in height. From the campground, follow the trail towards the Tumbling Creek route access. Instead of crossing over the creek, veer to the right onto the narrow trail and continue for approximately 500 m.
Day 2 - Helmet Falls to Tumbling Creek Campground
11.5 km: elevation gain of 480 m; elevation loss of 345 m. This section took us about 5 hours and 15 minutes to complete. You'll be gaining the roughly 480 m in the first half of the trail, hitting switchbacks early on. In the second half, you'll descend nearly as much, about 345 m, with steep switchbacks waiting for you in the final few kilometers. On this trail, as the forest starts to open up, you'll get your first look at the Rockwall!

Leaving Helmet Falls Campground, look for the directional signage on the tree for Tumbling Creek Campground. Cross the creek. This will take you onto the Rockwall Pass Trail.


The trail begins with an immediate uphill on a densely forested trail, with the initial few kilometers of this segment being the steepest. This part of the trail is a steady climb for about 3.2 km with switchbacks as you round Limestone Peak.

When the area starts to open up at a high plateau, it won't be long until the massive limestone cliffs of the Rockwall come into view!

Just a quick and sweaty selfie as we start to descend into the alpine valley under the Rockwall!
The Rockwall - in some sections, looming over 900m above the trail
The most breathtaking high-country hike I've ever experienced. The start of the valley under Rockwall:


You'll cross a small creek at about 4.2 m from Helmet Falls Campground. This is the last reliable water source until Tumbling Creek Camp; and a great spot for a break!

Cross the small creek and start to hike a steady uphill through a glacial moraine, with Rockwall on your right. The dragonfly photobomb was en point👌.


Follow the wooden planks over a small unnamed glacial lake. Then over a wooden bridge that has seen better days. However, the water is low enough that you can cross without the bridge.
Now, coming up in this next section is one of the most scenic stretches of the Rockwall! Get ready for vast, seemingly endless meadows, vibrant clusters of wildflowers in every direction (at least during our August visit), and even more breathtaking views all around. I had ALL the feels in this section.


Rockwall Pass - 2,240m elevation, the first of three mountain passes on the Rockwall trail. If you are not in a rush to reach Tumbling Creek Campground, take a break here - absolutely phenomenal and tranquil views of the Rockwall. Looking back, I regret not sticking around longer to really soak it all in!

Onwards to Tumbling Creek Campground
From Rockwall Pass, you'll reach a junction at Wolverine Pass 0.4 km up ahead. Keep left to begin a 3.0 km descent towards Tumbling Creek Campground, with a total elevation loss of 345 m. The descent begins gently and winds through open forests, with most of the descent and switchbacking in the final 1.5 km along a forested trail.

At Tumbling Creek Campground
Distance: 11.5 km (from Helmet Falls Campground); Elevation: 1,895 m

We're here! I really liked the layout of this campground. Tumbling Creek has around 18 tent pads, with the creek below as the primary water source. You'll also find two separate areas with bear caches, cooking tables and seating, and pit toilets.
Day 3 - Tumbling Creek Campground to Numa Creek Campground
7.7 km, with a cumulative elevation loss of 660 m between campgrounds. This section took us about 3.5 hours to complete. Starting back at the junction where Tumbling Creek Trail meets, follow the direction on the signpost for Tumbling Pass Trail. The day kicks off with a pretty decent uphill hike through lush forest, followed by some stellar views of the Rockwall and Tumbling Glacier as you make your way up through Tumbling Pass. It was a shorter day but jam-packed with incredibly scenic sections! The trickiest part of this trail was hiking down the steep and rocky switchbacks (while avoiding any slips) as you start to lose elevation descending towards Numa Creek.

Crossing this bridge over Tumbling Creek, where you'll start your hike going up alongside the campground on the other side of the creek.
Hiking up to Tumbling Pass - 2,210 m elevation, the second of three mountain passes on the Rockwall Trail.


Onwards to Numa Creek Campground

You'll encounter a few creek crossings along some rocky slopes as you make your way down towards Numa Creek.

In the last 1.5 km, or so, the trail starts to narrow and wind through lush and dense forest. In some areas, the trail becomes somewhat overgrown. I dubbed these sections as my very own 'nature spas' as you could not get away from branches and leaves brushing across your entire body🙂.
Numa Creek Campground
Distance: 7.7 km (from Tumbling Creek Campground); Elevation: 1,550 m
Here, you'll find food caches and eating areas located on one side of the creek, and tent pads situated on the opposite side. There is an eating area that can accommodate larger groups at this site. As for pit toilets, they are accessible on both sides of the creek.

Numa Creek stood out as my favorite creek to camp at on this trail. The juxtaposition of the smaller, crystal-clear creek merging with the larger glacial creek, all set against the backdrop of the enclosed forest, was incredibly picturesque. I could look out at it for hours... and I think I ended up doing just that!
This creek was also the perfect spot for a cool-down dip/"shower". The water was not as cold as Tumbling Creek (Tumbling Creek was freezing!) Below, you have Shane's technique of rinsing off vs. mine, haha. Who did it better?


Day 4 - Numa Creek Campground to Floe Lake
10.2 km: elevation gain of 785 m; elevation loss of 315 m. This section took us about 4.75 hours to complete. From Numa Creek to Floe Lake, all your elevation gain is in the first 6.8 km of the hike, then it's downhill to Floe Lake. But my-oh-my, it was a leg grinder and I struggled hard with the sections of steep switchbacks up to Numa Pass. But the views are incredible and the terrain is so stunning - I would do it all over again in a heartbeat!


Much of the hike is through thick and lush forest until you begin approaching Numa Pass. In the middle photo, I felt like I was in the meadow scene from the 'Sound of Music', and all I wanted to do was spin and frolic through the wildflowers!
At about 2.7 km from Numa Creek Campground will be the start of a lengthy stretch of switchbacks (that only get steeper) for approximately the next 3.3 km. It was at this point, once again, that I found myself questioning all the life choices that led me to believe hiking mountains was a great idea. But always worth it? 1000 percent!🙂

The terrain starts to flatten for a bit (though, doesn't last long) before you start your approach up to Numa Pass - about another 1.5 km.
Approaching Numa Pass - 2,355 m elevation, the third of three mountain passes and the highest point on the Rockwall Trail.


Onwards to Floe Lake Campground
The 2.7 km descent down to Floe Lake was such a reward, particularly after the intense hike up to Numa Pass. Here, you have meadows, wildflowers, forest-line trails, and glimpses of the lake along the way.


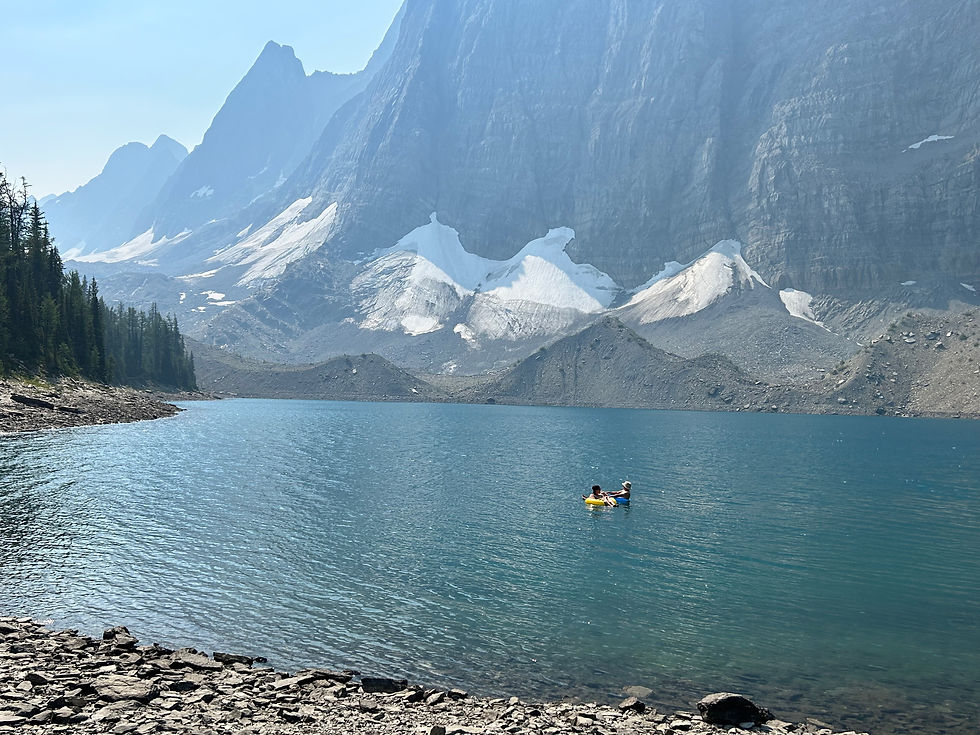
Floe Lake Campground - Night 1!
Distance: 9.2 km (from Numa Creek Campground); Elevation: 2,030 m
Surprisingly, the majority of tent pads are located high up in the forest with limited viewpoints of the lake. If you arrive early enough, you may get the two spots with picture-perfect views directly overlooking the lake. Floe Lake Campground has 2 food caches and eating areas, both offering awesome views of Floe Lake. There are also pit toilets at each end of the campground and a stream to fill up water near the Patrol Cabin (a short stroll along the rocky beach on the north end of camp).

Day 5 - Floe Lake, night 2!
If you get the opportunity to spend 2 nights at Floe Lake, do it. Maybe that's just me, but a partial day would just not be enough time to truly soak in the beauty of this place.
Following south around Floe Lake, there are a few lookouts you can access. While there is no designated trail up to these viewpoints, you can sort of make out a commonly followed path that others have used.


Day 6 - Floe Lake Campground to Floe Lake Trailhead
10.5 km, with an elevation loss of 715 m. It took us about 3.5 hours to descend down to Floe Lake trailhead. The trail starts with a slight elevation gain but it's a continuous downhill thereafter. You'll be going down a series of lengthy switchbacks, some steep sections, and some narrow spots as you make the descent. This is a mostly sun-exposed trail so make sure you pack enough water and keep hydrated! About 8.2 km from the campground, there is a chance to fill up water at Floe Creek - also a great spot to take a break if you need it.
Wake up for sunrise to enjoy the lake reflections. Full tranquility.


To Floe Lake Trailhead
Photo drop:


When you reach this next bridge, it's only another 0.5 km away from the start of Floe Lake trailhead!

And we're back!
There's always a whirlwind of emotions at the end of a multi-night journey, and this time was no different. We find ourselves smiling, feeling accomplished and strong, yet also exhausted and happy to have completed the trail without any mishaps. We are also thinking about burgers and drinks, or whatever next meal we are craving that is not dehydrated. At the same time, we are so sad that the hike is done and we already miss everything about the trails and backcountry life. We hope to see you again, Rockwall Trail ❤️.


Comments